Monday, May 17, 2010

Rustic Bench

Started building the "Rustic Bench" plan from the Knock-off Wood blog: http://www.knock-offwood.com/2010/01/plans-rustic-bench-pottery-barn.html

I am going to use this as a coffee table in the living room. I am going to make two modifications to the Knock-off Wood plans: 1 - The bench will be wider, 2 - the legs will be solid, instead of just two boards giving the illusion of being solid.

I glued up the top using three boards - premium pine 1 x 8 boards from Home Depot. It's going to be a lot of work to sand this top to remove all glue remnants and to flatten the top. The hard work on sanding should make the finished, stained end product look beautiful. I like the premium pine from Home Depot, it is more expensive, but still reasonable - the boards are usually flat and straight, with minimal or no knots and typically a subtle wood grain pattern.


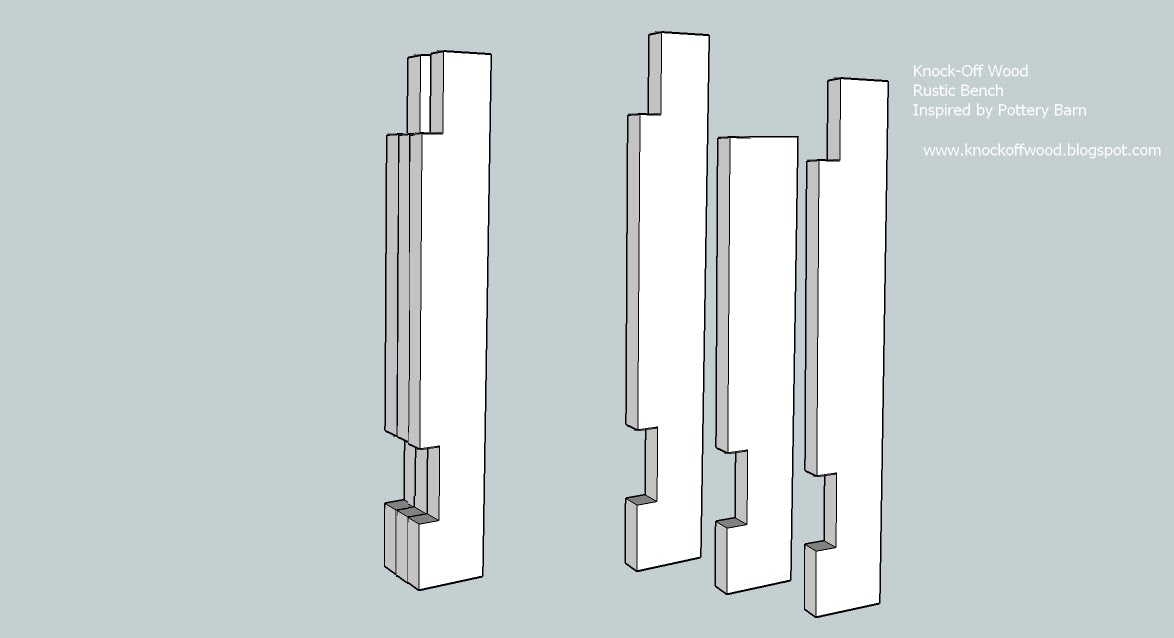
The solid legs are similar to the plans, but use three boards to replace the one board. The picture below gives you an idea what I was trying to do. The board on the far right of the picture below is from the plans from Knock-Off Wood, the board on the left is the same dimension and the board in the middle is very similar, but is cut 2.5" shorter.


Sandwich the three boards above as shown, then add a board on the end to create the "mortises" where the other boards will fit into these slots. This picture is the finished legs:


This picture shows the start of the three boards cut to length - I then glued them together and cut the grooves in the sides to create the mortise:


This picture gives you an idea of how the apron will fit into the top slot:


Another view of the finished legs.


Serving Tray Build

I built another serving tray, this one is going to be green - the "Bay Berry Green" milk paint.

I transferred the curve of the handle using the template to the 1x4 side board, just flip the template to draw the curve on the right-hand side of the board - I also clearly marked the center of the .75" hole for the dowel.
I checked to make sure the drill bit was the right size for the dowel.
I drilled the hole before I cut out the curve of the handle. I put a piece of scrap wood under the board so the exit hole will be nice and clean, no tear out.

I used a jig saw to cut out the curve of the handle.

I then attached the end boards to the tray using glue and 1.25" nails. I nailed the ends of the board flush with the sides of the tray.
I then glued the dowels into the side boards - this did not go so smoothly as the dowels fit too tightly in the hole and when I tried to force them in the handle broke. Pine is a soft wood and this can happen. I should have used sandpaper to make the dowels a little smaller, or the hole a little bigger to get a nice tight fit, but not so tight the wood breaks!


It was nothing some glue, one nail and some clamping pressure could not fix. Remember that a nice tight glued joint will actually be stronger than the wood around it.

I then used glue and nails to attach the sides to the serving tray. I added clamping pressure, mostly because I have a few clamps. If there is a good fit, the glue and nails will be enough, without using the clamps.

I intentionally cut the dowels a little long. It is easier to make the dowel shorter after the glue dries than to make it longer ;-)

I did a lot of sanding and then added a coat of Bay Berry Green milk paint from General Finishes.

In my next post I will distress and add glaze to finish this project.


Wednesday, May 12, 2010

Here are pictures of the tray that I made - and my awesome new grill:


And an inside picture of the serving tray:

I'll start posting step-by-step instructions with pictures later in the week.

Tuesday, May 11, 2010

Here is the plan for the Serving Tray:

Link to the PDF version: https://docs.google.com/fileview?id=0ByU67OqW1u9vNTQwZWY4ZTMtYTg0OC00OGJlLThmYWItMDgyZTQwNzI2YzVh&hl=en


Cut List:
A – Qty=1-(bottom of tray from 1 x 12 board): 11.5” x 21” x .75”
B – Qty=2-(sides of tray from 1 x 4 board): 27” x 3.5” x .75”
C – Qty=2-(ends of tray from 1 x 2 board): 11.5” x 1.5” x .75”
D – Qty=2-(dowels for handles): .75” dowels cut to 13” length


Template for handles:

Directions:

1. Transfer handle pattern to ends of side boards (B)

2. Drill .75” holes in ends of side boards (B) per the pattern – tip: put a piece of scrap wood under the board that you are drilling to minimize “tear out” to the other side of the hole you are drilling.

3. Cut side board (B) to shape by using a jig saw

4. Thoroughly sand the board to smooth the edges that were cut in step 3

5. Attach end boards (C) to bottom of tray (A) using glue and 1.25” nails make sure edges are flush.

6. Glue dowels (D) into holes in side boards (B) and quickly glue and nail to the bottom (A) using 1.25” nails – tip: you should dry fit this together to make sure all is going to fit well before you apply glue. You want to attach dowels first, then attach to the bottom, but don’t let the glue set on the dowels so that you can make sure everything is squared up and flat before you nail to the bottom.

7. Remove excess glue before it hardens – it sometimes helps to let the glue set for 15-20 minutes so you can remove it while it is still a bit rubbery.

8. Sand, sand, sand to remove saw marks, soften edges and remove glue I usually start with 100 grit, then 200 grit, then 800 grit – to get that “soft as a baby’s behind” finish.

9. Add stain or paint


Link to inspiration piece: http://www.touchofclass.com/product/r912-001.do?code=CMS06

Serving Tray - Intro

I am going to create plans and a "how to" on making a very nice serving tray inspired by this tray:

http://www.touchofclass.com/product/r912-001.do?code=CMS06#

There are two finishes - the stained pine version in a dark cherry stain and a nice country green version with nice distressing. I hacked this tray and built one using basic 1 x 4 pine and a one inch dowel. It came together fairly quickly and has been a very handy tray to have.

It came in handy this last weekend for Mother's Day breakfast in bed. It was also used as a BBQ tray to help me carry salt, pepper, season salt, garlic powder, Worcestershire sauce and some nice juicy rib-eye steaks to the backyard for some grilling!

The tray is about 12" by 28" pretty big actually, but a very nice size for breakfast in bed.

I will upload pictures of my tray and a template for making the curves on the side boards that hold the dowels.

Sunday, May 9, 2010

Twin Plank Headboard

My most recent project was a headboard for my teenage son's bedroom. The headboard is based on plans from knockoffwood.com - an amazing site with keep-it-simple woodworking plans for amazing furniture. Here is the link to the plans:

http://www.knock-offwood.com/2010/03/plans-reclaimed-wood-headboard-full-and.html

These plans are based on very expensive ($699-$799) Mason headboard at Pottery Barn:

http://www.potterybarn.com/products/mason-headboard/?pkey=x%7C4%7C1%7C%7C10%7Crustic%20headboard%7C%7C0&cm_src=SCH

The project was fairly easy following the plans and probably cost about $75 - one-tenth of the Pottery Barn headboard.
The wood was very basic dimensional lumber from Home Depot. It was put together using wood glue and a nail gun. Most of my projects have been smaller and I was surprised at how many nails I had to use - I think I reloaded the nail gun twice during this project. When I bought a large box of the nails, I thought it was a lifetime supply, but if I keep building projects on this scale, it might only last a month or so!
The finish we used was oil-based dark walnut - two coats, one coat of Poly-shades dark walnut and one coat of polyacrylic in a satin finish. I am using "we" on this build because my wife is the creative/design consultant and has a lot of input, particularly on the stain and finish.

I did some distressing of the wood before we applied the finish - I banged on the wood with a hammer, chisel, file, awl, pretty much everything in the toolbox. At first it was difficult to start beating up a beautiful wood headboard that I had so carefully and lovingly put together, but then I realized the distressing is just part of the creative process and after I saw how the stain accentuated the distressing marks, I wish I had done some more!

Now I need to make another one to match for the other bed in the room.

Here is a closer view of the headboard:


Here is a link to my Flickr images that show some of my other projects:

http://www.flickr.com/photos/48543689@N07/